The What, Where, When, and How of Applying for an F1 student Visa
“It’s been said that a pretty face is a passport – But it’s not; it’s a visa, and it runs out fast.” Julia Burchill
Amen! Not only does it run out fast, but it is also a cumbersome process to acquire one! If you ask me, between the two, a pretty face is easier to achieve thanks to skilled make-up! Ha, jokes apart, for most of us attempting to study in/emigrate to another country, getting a visa might be an uphill task!
The same goes for a DDS/DMD aspirant; if you are not a COTUS (Citizen Of The United States) or a Green Card holder (Permanent US Resident), once you get accepted into a US Dental School, the next step is to get an F1 (student) visa.
Sounds daunting, does it! Don’t you worry! At CAAPID SIMPLIFIED, our goal is to empower you at every step of your CAAPID journey with extensive ‘Gyan’ on the ‘what, when, how, and where’ of it!
Table of Contents
ToggleWhat is an F1 student visa? Is it easy to get one?
Let’s start at the very beginning! A visa is to a country, what a ticket is to an airplane! While tickets are for entering the flight, a visa is a ticket to enter a country! Tickets are for travel, and Visa is for a stay. Now whether it is easy to get it or not, depends on the type of visa and the country you apply to!
The first step to getting something is to know what you want! You know you want to study (DDS/DMD) in the US as a full-time student, so it’s obvious you need a STUDENT VISA. Now, a student visa could be either F or M. While F is for higher education in a university or college (even high school or private elementary), M is for a vocational or non-academic institution. There is also an additional category, ‘J’ if you fall under the exchange visitor program.
As a foreign student coming to the US to pursue a full academic course to study in a SEVP-approved school, you will fall under the category F1 Non-Immigrants. There we go, Voila! Your spouse and/or children (<21 years) who wish to stay with you belong to the F-2 category. If only visiting, then a regular B2 visitor/travel visa should suffice!
Now that we know what we want, let’s learn how to get it!
How To Get an F1 Student Visa?
We have outlined a process flow for you, to get an F1 student visa.
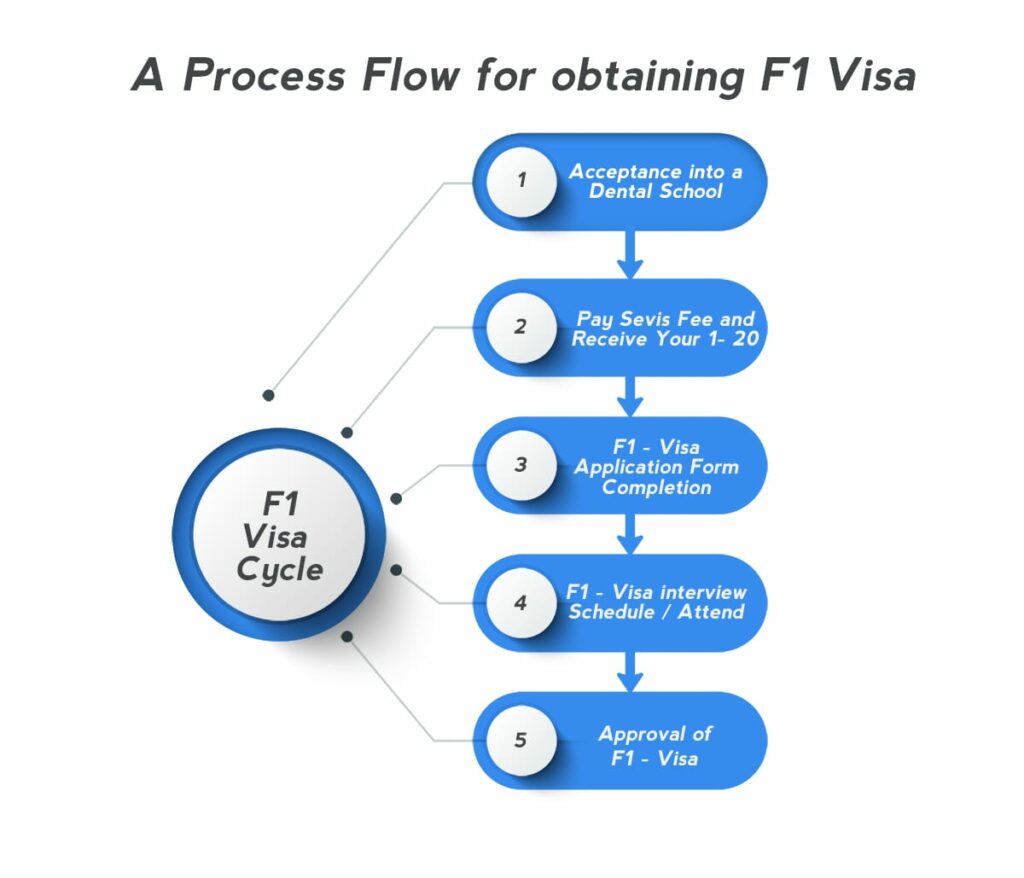
The Five Main Steps to An F1 student Visa are listed below.
Let us delve deep into their details:-
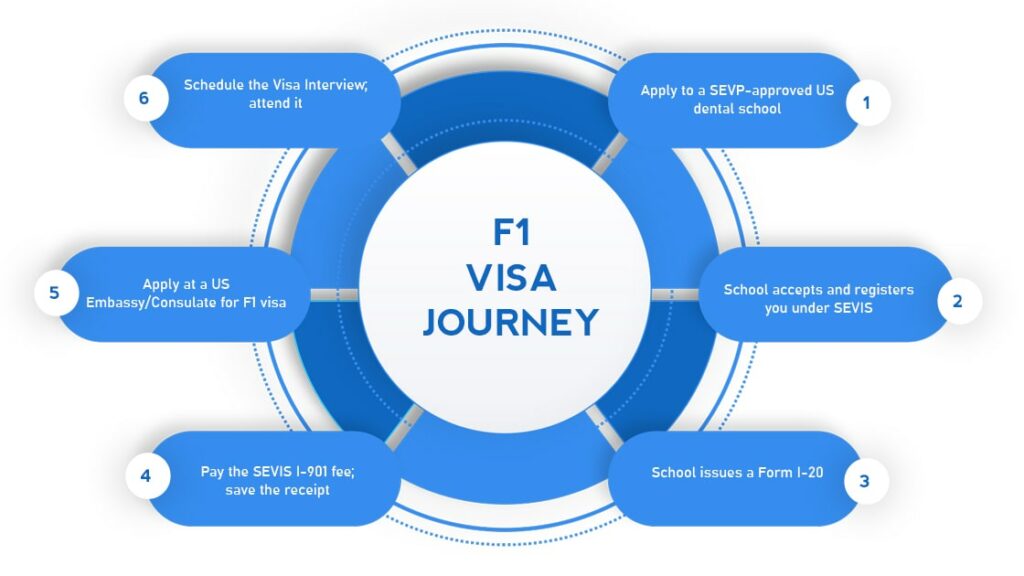
1. Acceptance Into An Sevp-Approved Dental School
First, you need admission into an SEVP institution, as a FULL-TIME STUDENT. So what is a SEVP-approved school? A Student and Exchange Visitors Program (SEVP)-approved Institution is one which is permitted to take on international students into their standing programs. ALL Dental schools in the CAAPID arrangement are SEVP-approved.
After admission, your school then registers you for the Student and Exchange Visitor Information System (SEVIS) and you are allotted a unique SEVIS number.
2. Procuring Form I-20 From The School
Your school shall issue this form I-20. It is merely a ‘Certificate of Eligibility for Nonimmigrant (F-1) Student Status-For Academic and Language Students.’ It will be issued if you prove the following (i.e satisfy the below prerequisites)
- Strong Ties to your home country – Not that you have to wear your national flag on your sleeve, just that you must maintain a residence and roots in your home country. Having a family, bank accounts, property, etc. are proof of your attachment to your homeland and a strong likelihood that you will go back home.
- Financially Sound – Basically, you have to prove that you/your family can finance your education. It could be a reasonable bank balance, procuring an educational loan, and the like. Proofs of such financial soundness include
- Original letter from your bank on its official letterhead, stating the available funds. Your name and account details, along with the balance amount, dated within the last six months and the bank’s seal should be present
- A signed sponsorship letter from the individual sponsoring your funding, along with their original bank documents as mentioned above
- In the case of a student loan, a loan sanction letter clearly stating the approval of the loan and its amount
- In case of a scholarship/ grant, an official letter stating the amount and duration of the scholarship awarded
- English Proficiency – A straightforward requirement. If you can read this blog, you have already checked off this step!
3. Paying The SERVIS Fee
Congratulations! The form is now in your hands – the next step is to pay the SEVIS I-901 fee of USD350 through the link FMJFEE.com .
A gentle reminder – Please download/save the receipt.
Also, the SEVIS fee is in addition to and separate from visa fees and SEVIS school’s administration fees.
Alright, so far, we’ve covered the steps that are prerequisites for the actual application. Your school is an integral part of here. Hereafter it’s between you and the US Embassy/Consulate.
Let’s gear up to the actual visa application process.
4. Filling Up The Online Visa Application – Form Ds-160 And Paying The Visa Fee
Hurray! We are, well, halfway there!
While the actual order and the steps involved depend on the Embassy or Consulate through which you apply, the following are the general order.
- Apply online through e-Application Form DS-160
Make sure you have the following documents handy before you start applying:
- A recent digital photo – 2×2 inch (51x51mm), taken within the last six months.
Do check here for the exact and latest requirements.
USTravelDocs Step 2
Visa Fee – USD160
Again, check here for the updated fee amount and options to pay the same.
USTravelDocs Step 3
Download and safe-keep your receipt no. to book a visa appointment.
- A valid Passport valid for at least 6 months beyond the intended stay in the US
- Original Form 1-20, issued by your school/program
- Marriage Certificate – Photocopy of the marriage certificate of ALL spouses of principal applicants
- Print/download the DS-160 barcode page. This DS-160 number is required to book the visa interview.
The DS-160 filled form and confirmation page must be brought to the Visa interview, along with the visa fee receipt.
5. Schedule The F1 Student Visa Interview
Applied online – DS -160 filled in – Check
Visa fee paid and receipt downloaded – Check
So what’s next – schedule a visa interview!
Choose the Embassy or consulate from the place where you would be interviewed, using the same profile you created for payment of visa fees. Go ahead then and pick the slots through the dashboard. There are 2 kinds of appointments to be scheduled –
- One for the Visa Application Center (VAC) for biometrics (fingerprints and photo), and
- The other, is the visa interview at the Embassy or Consulate
The appointment at the VAC should be at least 1 day prior to the interview at the Embassy or Consulate.
To schedule an appointment, keep the below handy:
- Passport number
- Visa application fee receipt number.
- The 10-digit barcode number from the DS-160 confirmation page
Ideally, the visa interview appointment at the U.S. Embassy or Consulate should be made in the country of residence. Remember, appointment slots and waiting times depend on the location, timing, and visa category; hence it is safer to apply for the visa as early as possible.
For instance, at the time of writing this blog, an appointment for student visa wait time is around 100 days from Mumbai, 465 from Chennai whereas it is only 3 days from Singapore and 4 days from London!
6. Attend The F1 Student Visa Interview
Judgment day! Time to attend the visa interview at the scheduled US Embassy or Consulate. This is the most crucial event in the run-up to your DDS journey. However, it need not be tense; keep reading, and we promise to guide you along the path.
Here is a list of documents required for the Visa Interview. As already mentioned, you will be undergoing 2 sets of interviews:
- At the VAC, for biometrics and fingerprints
- At the Embassy/Consulate
Documents required for the interview at the VAC
- Passport
- Form I-20
- DS-160 and
- Visa fee receipt
Though this is merely for biometric purposes, and no interviews or questions are asked, we always recommend keeping your other documents with you.
Documents required for the actual interview
Carry all documents you think could come in handy. Better to be over-prepared than be under-prepared. You could keep them organized under different dossiers.
The file with all mandatorily required documents should consist of
- Passport – Valid for travel to the US, with validity date extending to at least six months beyond the intended period of stay. A separate application for every person requiring a visa, if your passport includes multiple people.
- Form DS -160 confirmation page (barcode page)
- Application Fee payment receipt (USD160)
- Form I-20 – signed by both the school and the applicant. A separate form is required for spouses and/or children intending to live with the applicant, in the US.
- SEVIS I-901 fee payment receipt (USD350)
- Photo – may or may not be required, because you are required to upload a digital photo at the time of online application via Form DS-160; safer to bring a couple of hard copies though. Specifications are to be found on the Photo Requirements page.
- Interview Appointment Letter, confirming interview slot
It is recommended to also carry a copy of other additional documents, such as
- Proofs related to your financial status (bank statements, a letter from sponsor/loan issuer, IT returns, credit card statements, etc).
- A separate folder for your Academic/Experience-related documents, such as Transcripts, degree certificates, Test results for NBDE, TOEFL, ADAT, etc., Acceptance Letters, Experience Certificates etc.
Great! Now that the documents are in place, all that remains is to ace the oral interview by the Visa Officer. Be confident, clear and concise while answering the officer. Remember, you have reached this far by acing other complicated, technical interviews. Of course, you can talk your way through this!
Your fingerprints will be taken during this leg of the interview process as well, and your Passport will be collected.
In rare and infrequent cases, the consular officer may also ask for further administrative processing.
Additional Visa Issuance Reciprocity Fee – If the visa is approved, an additional fee may be levied, subject to your nationality.
7. Track Your Visa And Collect Your Passport
The ball is truly in their court now! All you can do is wait; and of course, track your visa!
You can check your DS-160 and visa application status online, with the help of your DS-160 barcode number and the interview location. You can also track it via email and telephone.
Once the visa is processed and the passport is “Ready for Pick-Up” at the location scheduled by you during your appointment, you will also receive an email and SMS notification!
If all your documents are in order AND you meet all the visa requirements, it is highly likely that your visa will be approved, subject to the Visa Officer’s discretion. Hurray!
Let’s understand an F1 Visa journey through this flowchart or pictogram👇
Conclusion
Hopefully, that’s the end of your nerve-wracking journey of application and admission into DDS. Life in the US as a DDS student will be no cakewalk, but for the time being you can breathe a sigh of relief!
We are positive that this write-up lifted the fog on most, if not all, of your queries! If you are still unsure, or need further guidance, we are right here. Our F1 Visa video course is a detailed and step-by-step guide to walk you through the application process. Why go to a visa agent, when you can have access to CAAPID Simplified videos?
Forms or words used throughout the process and therefore in this blog post
SEVP – Student and Exchange Visitors Program
SEVIS – Student and Exchange Visitor Information System, an online Database connecting immigration authorities and US educational institutions which provides info on international students.
Form I-20 – a Certificate of Eligibility for Nonimmigrant Student Status
Form DS-160 – Electronic Visa Application form.